
ATAK Quick Start Guide Part 5: Connecting to the OpenTAK Server on the Nucleus
This is Part 5 of a multi-part ATAK guide. See the below table of contents if you haven't been through those yet.
ATAK Quick-Start Guide Series
Also check out the Nucleus - as this guide is mostly about using the TAK Server Configured variant of that radio. You only need one Nucleus with a TAK server for this to work. All other Nucleus radios you own can access the server as long as they're in range.
The Problem with TAK Servers
TAK Server is one of the most powerful features in the ATAK ecosystem. Once your teammates are connected to a server, you're sharing live positions, markers, and data packages over an actual networked connection instead of relying solely on Meshtastic's slower radio link. It's a real force multiplier.
The problem? Getting people connected to a TAK server has historically been a pain. The official TAK Server software was designed for large-scale military deployments — not small teams running off a portable mesh radio. Sharing credentials typically means generating certificates from the command line, exporting files, and hoping the person on the other end can figure out what to do with them.
OpenTAK Server (OTS) changes that. It's an open-source TAK server built to be simple to install and manage, with a clean web interface for all of it. That's exactly why it comes installed on the Nucleus.
Here's how to get another phone connected to it.
A Quick Note on QR Codes
If you've poked around the OpenTAK Server documentation, you've probably seen a QR code enrollment option. It looks like the easy button — and it is, when it works. The catch is that it requires your server to have a public domain name with a trusted SSL certificate from something like Let's Encrypt, which means it requires internet access to set up.
The Nucleus is designed to be deployed in the field — including situations where you have zero internet access. If you meet someone for the first time at an event in the middle of nowhere, you shouldn't have to rely on an internet-dependent setup process to get them on your network. So by default, the Nucleus isn't configured to use Let's Encrypt, and that's intentional.
If there's interest in setting up Let's Encrypt on your Nucleus to enable the QR code flow, we'll put together a separate guide for that. For now, the manual method below is what you want — and once you understand what you're doing, it's not complicated at all.
This guide is comprehensive so it can hold your hand through the whole process but trust me, if I figured it out, you can too.
What You'll Need
- A powered-on Nucleus with OpenTAK Server running
- Your phone (the admin) connected to the Nucleus WiFi
- Your teammate's Android phone with ATAK installed
- LocalSend on both phones — or an email account to pass a file
Part 1: On the Admin Phone
Step 1: Connect to the Nucleus
Connect your phone to the Nucleus WiFi access point. It's named 00xx-nucleus-ap, where xx is your node's serial number. The default WiFi password is 52235223.
Step 2: Open the Nucleus OS
Open your browser and navigate to:
10.20.xx.1:5000
Replace xx with your node's serial number. This opens the Nucleus OS — the built-in control panel. Pro tip: Bookmark this page on your phone. You'll be coming back to it.

The Nucleus OS home page. Your navigation buttons are along the bottom.
Step 3: Navigate to the OpenTAK Server Page
From the Nucleus OS home page, tap OpenTAKServer. This page shows the server's running state, connected EUDs, and a link to the OTS web interface. Tap that link to open it in your browser.

The OpenTAKServer page in Nucleus OS. The link to the OTS web interface is here.
Step 4: Log Into OpenTAK Server
Log in with your OTS admin credentials. If you haven't created an account yet, tap Register to set one up. This will be your admin account.
Step 5: Create a User Account for Your Teammate
Your teammate needs their own account on the server. Here's why: when ATAK connects to OTS, it uses a process called certificate enrollment — it logs into the server and gets issued a personal client certificate. That certificate is what authenticates all their future connections. No account, no certificate, no connection. No bueno.
In the OTS web interface, find the Users section (usually under an Admin or Settings menu) and add a new user. Give them a username and password.
Write those down — you'll need to pass them to your teammate, along with the file in the next step.
Step 6: Download the Truststore
This is the key step that most guides gloss over, so let's take a second on the why.
The Nucleus runs OpenTAK Server with a self-signed SSL certificate. "Self-signed" means the certificate wasn't issued by a public authority like Let's Encrypt — the server created it itself. ATAK won't automatically trust a self-signed certificate, so you have to manually give it a file called a truststore that tells ATAK: "This certificate is legitimate — trust it."
Think of it like a notarized letter of introduction. You're vouching for the server.
To get it: while logged into the OTS web interface, look for the Download Truststore button on the main dashboard. Tap it and save the file to your phone.

Alternatively, you can download it directly by navigating your browser to:
https://10.20.xx.1/api/truststore
Step 7: Share the Truststore File with Your Teammate
Get that file onto your teammate's phone. Two easy options:
- LocalSend — open LocalSend on both phones while on the same network (the Nucleus WiFi works), and send it directly
- Email — attach the file to an email and have them download it on their phone
- Be creative — carrier pigeon, smoke signals, USB-C drive, interpretive dance. Look, you're operating a mesh radio in the field, we trust you to figure out a file transfer. We can't do everything for you.
Make sure they save it somewhere they can find it — the Downloads folder works fine.
While you're at it, pass along the username and password you created for them in Step 5.
Part 2: On Your Teammate's Phone
Your teammate should be connected to the Nucleus WiFi and have the truststore file saved to their phone.
Step 8: Add the TAK Server in ATAK
Open ATAK and navigate to:
Hamburger menu (top right) → Settings → Network Preferences → TAK Servers
Tap the three-dot menu in the upper right corner and select Add.

Step 9: Configure the Server Connection
 The TAK Server configuration screen in ATAK.
Fill out the server connection settings as follows:
- Description — Give it a name (e.g., "Nucleus TAK Server")
-
Address — Enter your Nucleus's IP:
10.20.xx.1 - Check "Use Authentication" — Enter the username and password you created for them
- Check "Enroll for Client Certificate"
- Make sure "Enroll with Preconfigured Trust" IS checked
- Tap Advanced Options
- Set Streaming Protocol to SSL
- Set Server Port to
8089 - Tap Import Trust Store → find and select the truststore file
- In the password field next to it, enter:
atakatak(this is the default password OpenTAK Server uses for the truststore) - Leave everything else blank
- Tap OK
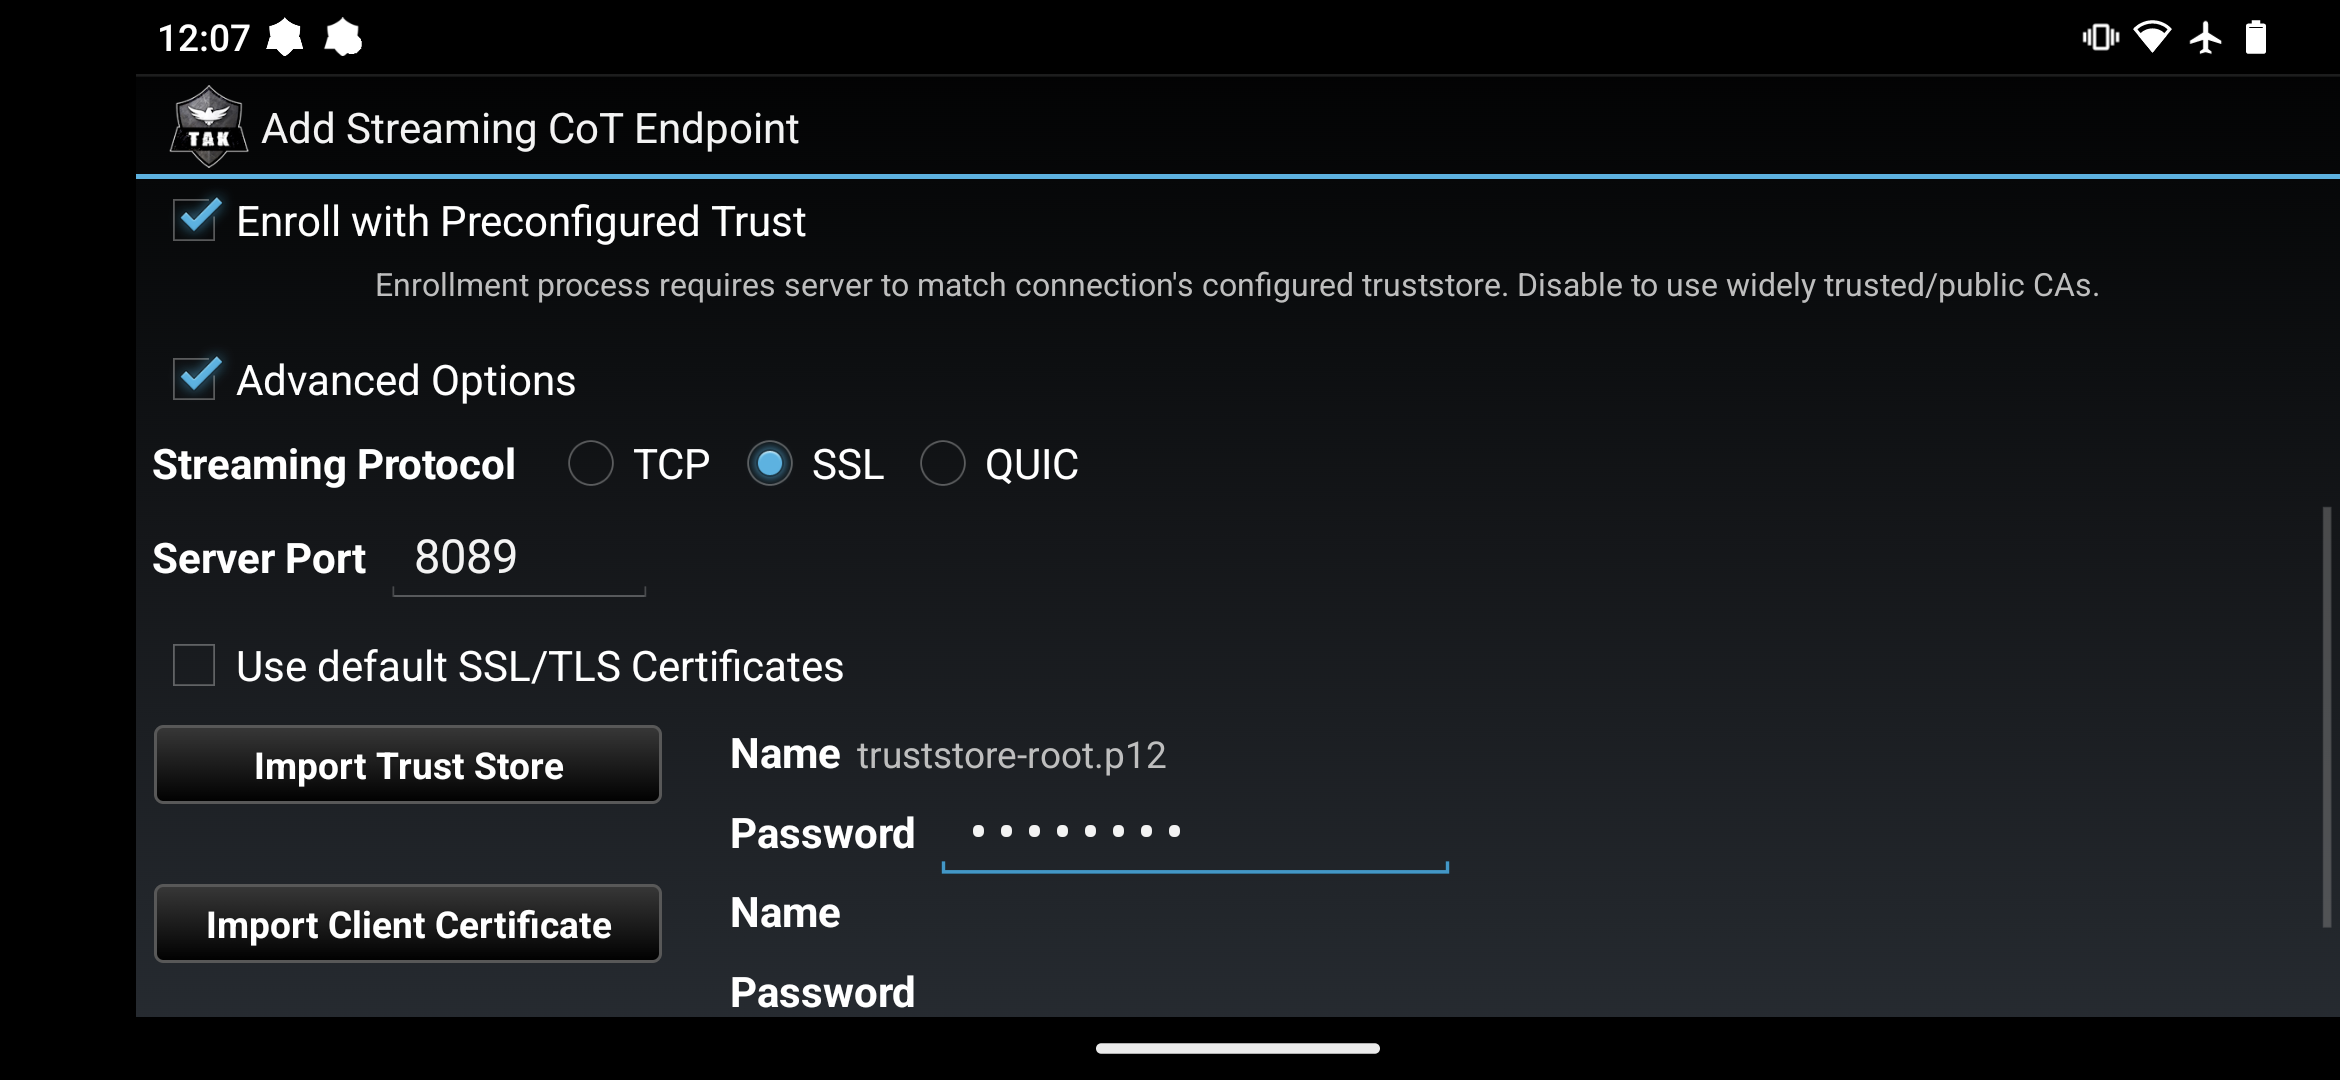 What your settings should look like when using a self-signed certificate (the default on the Nucleus).
After a few seconds, ATAK should confirm that enrollment succeeded and automatically connect to the server.
Step 10: Verify It's Working
Once connected, the server will show as active in the TAK Servers list. When both phones are connected to the same server, you'll see each other's positions on the map — which is the whole point.
If the connection fails, check these first:
- The truststore file was downloaded from the right server and shared correctly
- The truststore password is
atakatak - The server address matches your Nucleus's IP exactly
- The Nucleus is on and OTS shows as running in the Nucleus OS
Wrapping Up
Once you've done this a couple of times it's pretty quick — the prep work on the admin side takes longer than actually connecting ATAK.
And now that you understand what the truststore is and why it's needed, you can troubleshoot it if something goes sideways instead of just staring at a failed connection and wondering what went wrong.
If you're onboarding a group, you create one account per person in OTS, but the truststore file is the same for everyone. Download it once, share it to the whole team — and honestly, send it in advance. It's a great way to find out who on your team can follow basic instructions before you're all standing in a field together. Anyone who shows up without it downloaded and can't explain why has forfeited their right to complain about the setup process. You have our full permission to shame them publicly. We'll allow it.
If you made it this far and still haven't picked up a Nucleus yet, consider supporting us and picking one up here. Your purchase not only gets you equipped with great gear, but also helps support our educational content!
If you're still getting your ATAK setup dialed in, check out the rest of the guide:
- Part 1 — Setting Up ATAK
- Part 2 — Comms and Offline Maps
- Part 3 — Map Controls, Markers, and Data Packages
- Part 4 — Technical Difficulties
And if you found this helpful, give us a follow on Instagram, Facebook, and X — it really helps when this stuff gets shared.